Branching off of the Learning the Shell series of posts, I have started to explore the Writing Shell Scripts chapter of William Shotts’ The Linux Command Line. I am not completely unfamiliar with the concept of writing scripts to automate functions, yet most of my experience with scripting has been in the context of Windows batch files. Here I am focusing on Linux. In this article I will demonstrate how writing a script can simplify a routine process. I won’t be following an exact example from the William Shotts material, but rather, applying some of the principles learned in sections 1 and 2 toward keeping my system upgraded and maintained.
I am currently running Ubuntu 24.04.3 LTS, using its default terminal, and nano as the text editor. Not long after installing Ubuntu, I found myself repeatedly running certain commands to keep my system updated. I thought this scenario would be a good candidate for setting up a script so I don’t have to type these same commands over and over again.
First, I will explain what a package management system is. Next, I’ll describe the purpose of each command I’m running so readers who may be unfamiliar with Linux can follow the logic. Finally, I’ll demonstrate how to convert these commands into a script and show why that is helpful. This is all very elementary, so if you are an experienced Linux user, none of this will be new to you.
PACKAGE MANAGEMENT SYSTEMS
A package management system is a collection of tools that automate the installation, upgrade, configuration, and removal of software packages on a Linux or Unix-like operating system. Different families of Linux use different package management systems. In the Red Hat family (Fedora, Red Hat Enterprise Linux, Rocky Linux, AlmaLinux), packages are built in the RPM format and users typically manage them through the DNF (Dandified YUM) command-line tool. Arch Linux relies on Pacman with its own package format, while openSUSE uses Zypper to handle its RPM packages. I’m running Ubuntu, which belongs to the Debian family, and therefore uses APT (Advanced Package Tool) to manage .deb format packages.
KEEPING MY SYSTEM UP TO DATE
I like keeping my system maintained with the latest stable packages because it ensures security patches are applied in a timely manner, performance improvements are integrated, and I can rely on my software to run smoothly without unexpected bugs or compatibility issues. There are several steps to accomplish this using APT.
sudo apt updateThe update command fetches the latest package lists and metadata from the repositories configured on the system. These repositories are online servers that host collections of software packages, along with information about their versions, dependencies, and availability. By running apt update the package manager contacts each repository and downloads an updated index of all the software that repository provides. This updated list allows the system to know which packages have new versions, which dependencies are required, and whether any packages have been removed or replaced.
sudo apt full-upgrade -yWhereas the update command refreshes the list of available software, the full-upgrade command applies the newest package versions and adjusts dependencies accordingly.
It should also be noted that I am using the full-upgrade command here. There is also the upgrade command (without the ‘full-‘ prefix). The difference between the two is that apt full-upgrade will upgrade packages and intelligently handle dependency changes. For example, it might remove obsolete packages or install new ones if required. On the other hand, apt upgrade will upgrade packages to the newest available versions, but it will never remove packages. Therefore, if a package upgrade requires removing or installing new dependencies, apt upgrade will hold back those upgrades instead of making changes.
sudo apt autoremove -yThe autoremove command removes packages that were automatically installed as dependencies but are no longer needed. When you install software in Linux, the package manager often pulls in additional libraries or tools required for that program to run. If those libraries are no longer required, for example, after uninstalling a program or after a full-upgrade that replaces dependencies, they may remain on the system even though nothing else uses them. Over time, this can lead to unnecessary clutter, wasted disk space, and potential security risks. Running autoremove helps keep the system clean by identifying and safely removing these orphaned packages, ensuring that only actively used software and its dependencies remain installed.
sudo apt cleanThe clean command deletes downloaded package files stored in the local cache (/var/cache/apt/archives). When you install or upgrade software using APT, the package manager first downloads the .deb files into this cache before unpacking and installing them. By default, these files remain in the cache even after installation, which allows you to reinstall a package without re-downloading it. However, over time the cache can grow quite large. Running apt clean clears out all of these cached package files, freeing up space and ensuring that future installations pull fresh copies directly from the repositories.
SCRIPTING THE COMMANDS
So as you can see, there are four individual commands I am working with here. If I wanted to run the complete cycle, this would normally involve typing out these four commands one-by-one. Alternatively, I could string the commands together like this:
sudo apt update && sudo apt full-upgrade -y && sudo apt autoremove -y && sudo apt cleanYet even that would involve me typing out that whole string each time I wanted to run this set of instructions. This is precisely where a script can come in handy. By creating a script, I can invoke the entire sequence with a single terminal command. In my script, that single command becomes system_update.
Here is my custom Bash script:
# Automating updates/upgrades/cleaning up
# Add this to ~/.bashrc
system_update() {
    sudo apt update && \
    sudo apt full-upgrade -y && \
    sudo apt autoremove -y && \
    sudo apt clean
}
I’ve already gone over what the four commands update, full-upgrade, autoremove, and clean do. Now I will explain the other characters you see in this example.
The hash mark # signifies a remark or comment. Bash ignores these. Comments are for the humans reading the script. They are notes written as reminders or to help clarify something. In my example, the first comment is a brief description of what the script does and the second comment is showing where I applied the script (i.e. the ~/ represents my home directory and .bashrc indicates the hidden file called bashrc). The .bashrc file is itself a shell script that runs automatically whenever a new Bash session is started. It’s used to configure or customize the user environment so that the terminal behaves the way you want it to each time you open it. This is why I chose that file as the location where I added my system_update script. I’ll show you shortly how I did that, but first I will explain the rest of the script.
The name I gave the script is system_update. The empty parentheses () indicate a classic Bash function definition. The left curly bracket { opens the function body of the script. Everything between it and its matching right curly bracket }, which you can see as the last character of this script, is part of the function.
The sudo command allows a permitted user to execute a command with elevated (superuser or root) privileges. It’s commonly used in Linux to perform administrative tasks such as installing software or modifying system files.
The two ampersand characters && indicate the logical AND operator. Meaning the next command only runs if this one exits successfully (status 0). The logic can be thought of as “this and the next.” If the current command fails, the AND will not be satisfied, and so the next command will not run.
The back slash \ tells Bash the command continues on the next line.
The -y option automatically answers “yes” to prompts, making the command non-interactive.
The right curly bracket } closes the function body.
EDITING THE .bashrc FILE
Now that I have the commands scripted out, I need to edit my .bashrc file to include this script so that it will be available for me to run anytime I launch a new instance of the terminal. I do that by opening the .bashrc file in my text editor:

Once I am viewing the contents of the .bashrc file in my text editor, I can add the script. In the screenshot below I am showing just the bottom of the .bashrc file, where I have entered my custom script.

After saving my edits and exiting the text editor, I then want to run the source command to reload my shell configuration so any new functions become available right away. Otherwise I would have to exit the shell and then log back in.

Now, any time I want to run the sequence of upgrade and maintenance commands, all I have to do is type system_update and the script will do its thing. Here is an example output of me invoking the system_update script from my terminal:
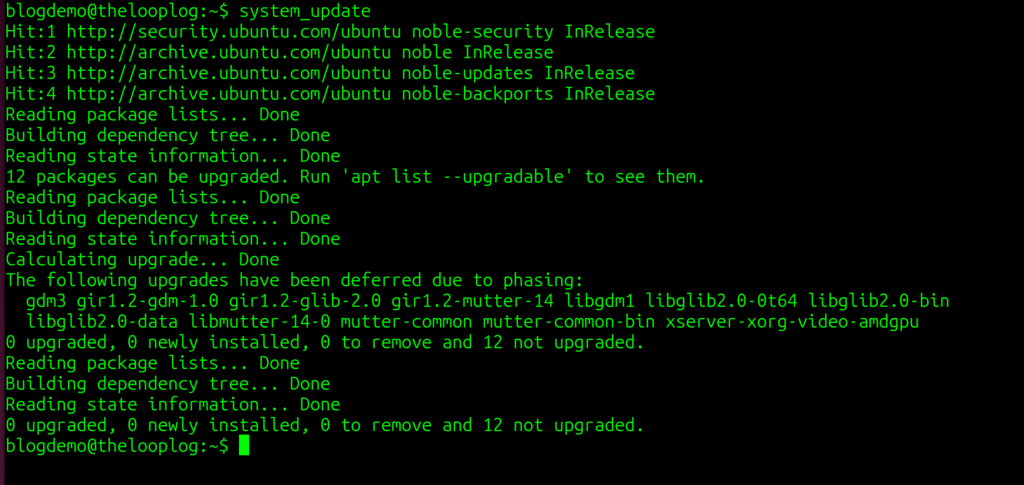
By typing that one command it executes:sudo apt update
sudo apt full-upgrade -y
sudo apt autoremove -y
sudo apt clean
Though it takes a little extra effort to front-load the script, once it’s there, it saves time and typing for all future instances of this sequence of commands. That little bit of effort pays off in the long run.